DatasourceSetup
This tutorial explains in detail how to set up a datasource.
A BioCASe Data Source
Publishing a database with BioCASe means it will be made accessible through a BioCASe web service, which will be used later by the biodiversity network(s) you want to join to access to your data. For example, the GBIF Harvester will send a BioCASe Scan request to that web service to get a list of all scientific names kept in the database, and subsequently several BioCASe Search requests to load all records for these names.
For each database you want to publish, you need to set up a BioCASe data source (do not mix that up with ODBC data sources on Windows machines). The resulting BioCASe web service is uniquely identified by its URL, which is a combination of the BioCASe installation’s URL and the name of the data source. So if you made your installation available at http://www.foobar.org/biocase during the installation process and set up a data source named Herbar, the URL of the BioCASe web service would be http://www.foobar.org/biocase/pywrapper.cgi?dsa=Herbar (data source names can be case sensitive, depending on your server’s operating system).
Creating a New Data Source
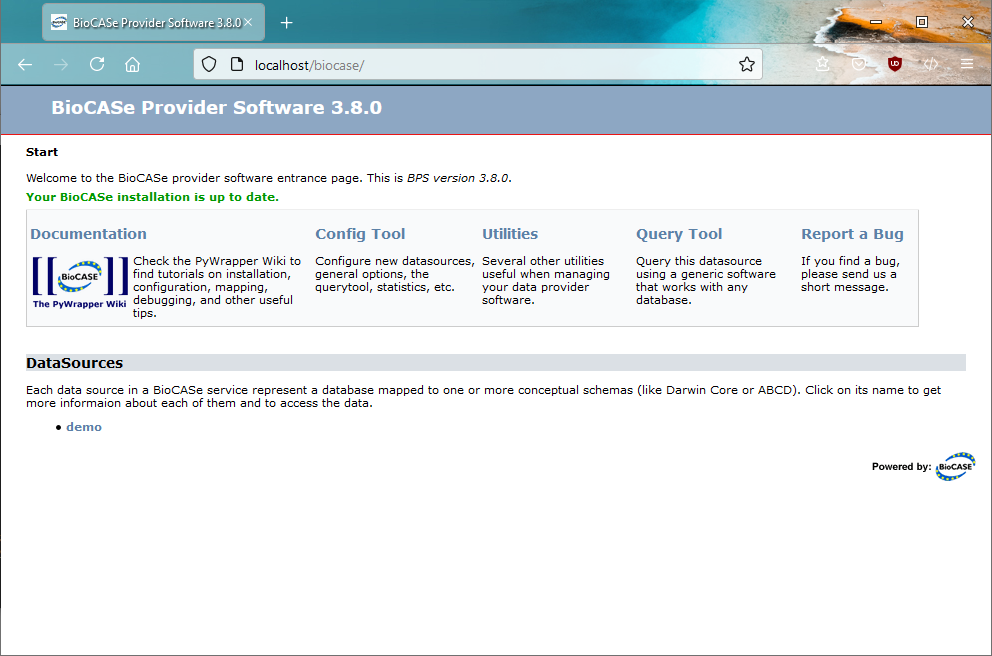
The start page of the BPS will always list the data sources currently configured, that means the web services offered by that BioCASe installation. On a fresh installation, it will be empty:
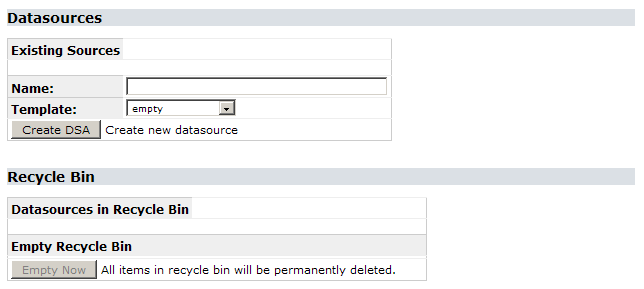
Creating a new data source can be done in the configuration tool. Choose Config Tool on the start page, then System Administration. Log in with the password you set during the installation process (if you didn’t change that yet, the default is ACDC). In the configuration screen, the sections Data Sources and Recycle Bin can be used to create, remove und restore a data source:
For now, we want to create a new, empty data source. Enter a name – without any spaces – in the text box and click Create DSA (remember that the datasource name is case sensitive on Linux machines). After a second, it will appear in the list of existing data sources with a clickable link. By doing this, you created the first BioCASe web service for your installation. Clicking Remove will uninstall this service again (putting it in the recycle bin, so you can restore it later).
Tip: If you select abcdmetadata in the template drop-down list, your data source will be created with an ABCD mapping for all the metadata elements stored in the metadata table mentioned in the Preparation guide. So if you did use the templates in sampledb/abcdmetadata to create the metadata table in your database, you can use this template to spare the hassle of mapping this table and start right away with your occurrence data.
Setting up the database connection
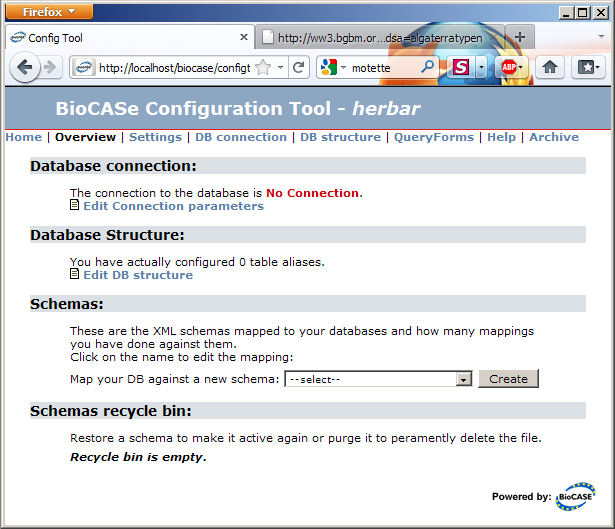
Clicking on the data source you’ve just created will take you to the datasource configuration tool. Note that the Schemas section will be empty if you’ve created an empty data source or list two schemas (ABCD 1.2 and 2.06) if you created the datasource based on the abcdmetadata template:
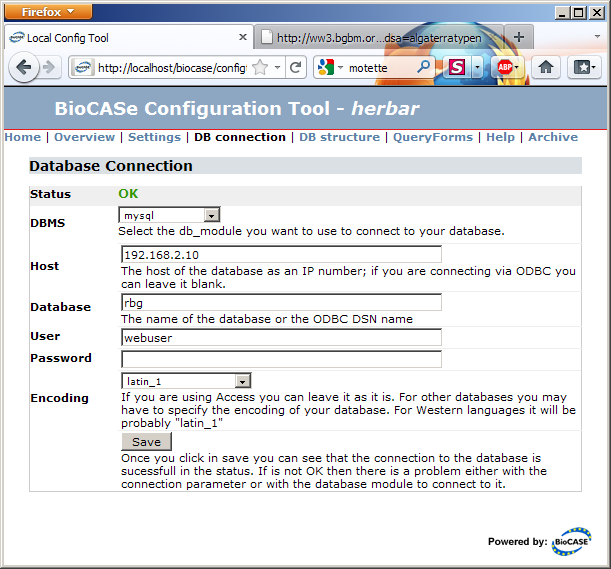
The link in the Database Connection section will take you to the connection parameters dialog. Fill in the values for your database, press Save and the connection status should turn into a nice green OK.
DBMS: Select the entry appropriate for your collection. The BPS can directly connect to database servers (MySQL, Postgres, DB2, SQL Server, and Oracle) and to Desktop-DBMS like Access and FoxPro through ODBC. ODBC is only available on Windows, so if you plan to use it, BioCASe must be installed on a Windows Server.
Host: Enter the IP address of the database server. If you’re connecting through ODBC, you must leave this empty. Instead, use Windows’ ODBC Administrator to set up a System (!) datasource; the server or file name of the database will be stored in the ODBC configuration.
Database: Enter the name of the ODBC datasource if you’re using ODBC, or the name of the database if you’re directly connecting to a server.
User/Password: Database credentials to be used. As written in the Preparation guide, you should create a user with just read access for this.
Encoding: The encoding of your database. If you’re not sure, leave the default, you can change it if you run into problems later. If you know your database is using a different encoding than latin-1 (which is typically the default for western languages), maybe UTF-8, select the appropriate entry in the drop-down list.
Once you’ve entered the correct values, press Save. Click Overview in the link list at the top of the page to return to the datasource configuration page. If the connection status doesn’t turn into OK (and doesn’t after you’ve returned to the overview page), please read the Debugging guide about how to trace the problem.
Setting up the Database Structure
Clicking on Edit DB Structure on the datasource overview page will show the DB structure setup. Make sure the connection status at the top of the page still is OK.
In a first step, you will add all tables/views that hold information you want to publish with BioCASe. You can ignore all database tables storing only data you don’t plan to map to ABCD. Same holds true if you use cache tables (as explained in the Preparation guide): Only the cache tables need to be set up on the database structure page. In a second step, you will specify the foreign key references between these tables.
Adding Tables/Views with their Primary Keys
To add a table or view, just select it in the drop-down list. The name of the table will be filled in the Alias text box (you will use this alias later in the mapping process), feel free to change it into something that describes the contents of that tables (for example specimen for the root specimen table). Press Add to insert the table into the list.
Before continuing to the next table, select the primary key in the list of attributes under Primary Key Attribute(s). In case the data type is a string and not an integer, select text from the drop-down list. Press Add to add the primary key. If the primary key consists of several columns, you can add several primary key attributes.
Hint It has been noted that diacritic characters in primary key columns can cause problems, so you should try to use integer or ascii text columns as primary keys.
Redo these steps (adding the tables first, then the primary key/keys) for all tables you want to publish data from. Always remember to set the correct primary key column(s), even if they’re not defined as primary keys in the database.
Important Note: Tables without a primary key cannot be used by the Provider Software and will be removed upon saving!
Specifying Foreign Key References
Once you’ve added all tables, you can define the relations between these tables by defining foreign keys. In order to do this, go to the Foreign Key(s) column of the table that holds a foreign key reference to another table, select the alias of the referenced table and press Add. Select the attribute that stores the foreign key and change the data type if it is not integer, then press Add. You must specify as many attributes for the foreign keys as the primary key of the referenced table has, otherwise the Provider Software won’t be able to create a valid join between the tables. Also, they must be in the same order and have identical data types.
Redo this for all tables until you’ve specified all foreign key references.
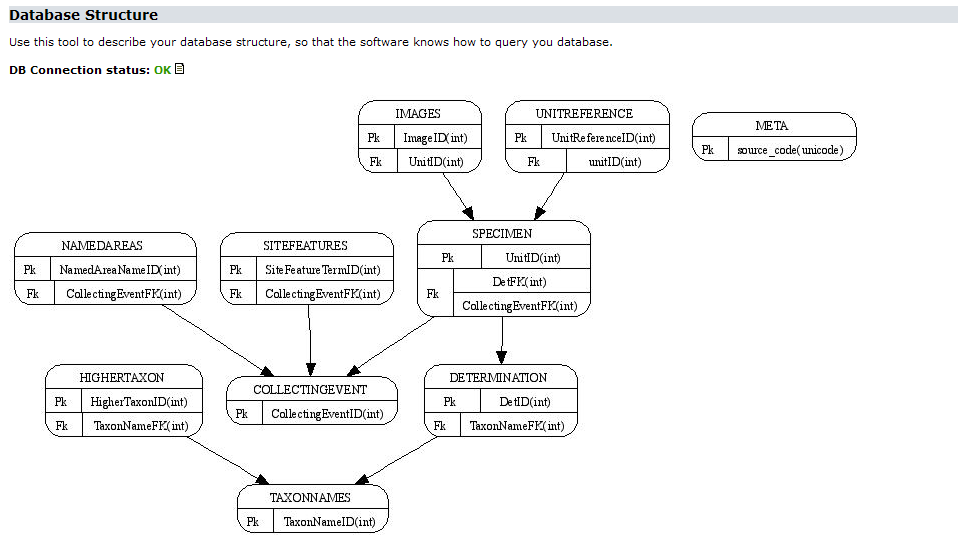
If you’ve installed the Graphviz package, the Provider Software will create a graph visualizing the current database structure. Each table will be visible as a node with the primary key(s) listed. References between tables will be represented by arrows, the foreign key(s) listed in the referring table:
Saving, Editing an Existing Setup
You can change aliases of tables you’ve already added to the list. To do so, go to the Alias text box of that table and type in a different name. Upon exiting the text box, all references to this alias will be updated in the table setup; also the graph will reflect the changes. But caution: Schema mappings use these aliases to bind schema elements to tables and columns, if you change an alias you’ve already used in a schema mapping, you will break this binding! So it is advisable to decide for meaningful alias names and keep them stable once you’ve started the mapping process.
Once you’ve added a table/view to the table list, you can’t change the underlying table, since this would invalidate all the primary and foreign key attributes. If you’ve added the wrong table, remove it by using the trash can symbol next to Delete Alias and add the correct table/view.
If you’ve finished the table setup and the graph displays the model of your database correctly, save the configuration by pressing Save at the bottom of the page. This is important; navigating away from the page without saving will cause your changes to be lost (even though you will be asked for confirmation)! It is advisable to save the table setup every now and then, for example once you’ve added all tables and primary keys.
If you edit an existing table setup and happen to realize you’ve messed it up, you can revert to the state when you’ve pressed Save for the last time by using the Revert button at the bottom. But be careful: All unsaved changes will be lost.
Important Note: The retrieval of tables/view/column names is currently only supported for the following DBMS: Microsoft SQL Server, MySQL, Oracle, Access, Postgres and FoxPro. If you use a different DBMS, you will see a simple text box instead of a drop-down-list, where you’ll have to type in the name of the table or column you want to add.
