ABCD2Mapping
This tutorial will explain how to set up a mapping for the ABCD2.06 data schema. If you intend to map another schema (e.g. one of the ABCD extension ABCD-EFG, ABCD-DNA or HISPID), you still should take the time to read it. Large portions of the process will be identical.
Access to Biological Collection Data Schema (ABCD)
ABCD in its current version 2.06 is the data schema typically used in conjunction with BioCASe. It is a highly complex XML data schema with about 1,000 elements that is able to store almost every piece of information that can be found in a natural history specimen collection or an observation database. The complexity is due to the fact that it can be used for a wide range of collections/databases – for living and preserved specimens, observations and culture collections, for zoological, botanical, bacterial and viral collections, marine or terrestrial, for herbaria, botanic and zoological gardens. For each of these special types, ABCD features special sections where information specific for this type can be stored. Other sections of ABCD will be shared by all these types, for example for gathering site, identifier or metadata.
The full ABCD documentation can be found in the http://terms.tdwg.org/wiki/ABCD_2 ABCD Wiki], a list of commonly used ABCD elements on the Wiki page Common ABCD2 Concepts and a comprehensive list of example values on the page ABCD2Concepts.
Creating an ABCD Mapping for a Data Source
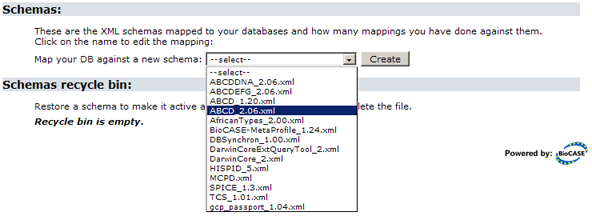
If you created a data source from a template (e.g. abcdmetadata), a schema mapping for ABCD will be already existent. In this case, you can directly jump to the next section. If you created an empty data source, the section Schemas in the data source configuration overview will be empty:
In order to create a new schema mapping, select the desired schema from the list and click Create. For ABCD, choose ABCD_2.06.xml (be careful not to hit one of the ABCD extensions, they look quite similar). After clicking Create, you will be directed to the mapping editor, which will allow you to edit the mappings.
The Mapping Editor
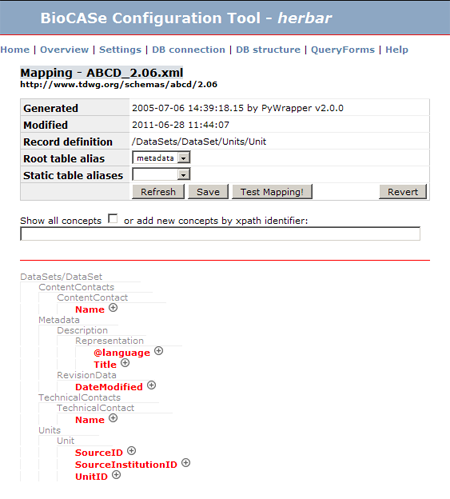
The mapping editor allows you to add, remove and edit ABCD mappings. On top you’ll find some summary information, on the bottom you’ll see the structure of the ABCD mapping:
First thing we will do is to set the root table, which is the table that holds the records you want to publish (specimens or observations). That table must hold one record per object to be published, identified by a unique identifier (called UnitID). This identifier doesn't need to be the primary key necessarily, as long as it is unique (if that sentence confuses you, ignore it and just keep in mind that the UnitID must be unique.) Use the drop down box labelled Root table Alias to select the root table of your data model.
If your metadata table holds just one record (because all occurrences published share the same metadata) and if it is not linked to the root table by a foreign key, you can specify this table in the drop-down box Static table Alias. The Provider Software will use a natural join to connect the metadata record stored in this table to all occurrences published. If your metadata table is referenced by a foreign key in the root able, you must not declare the metadata table as a static table! So either join the metadata table using a foreign key OR declare it as a static table.
Note: If you're using Access, you cannot use a static table, because Access doesn't support that. So when using Access, you always have to reference the metadata table with a foreign key.
When you’ve set the root table (and static table, if you use that), press Save. As with the DB structure setup, this will write your changes to the configuration files, closing the tab without saving will discard your changes! Also, in case you messed something up, you can use the Revert button to restore the state when you’ve saved for the last time.
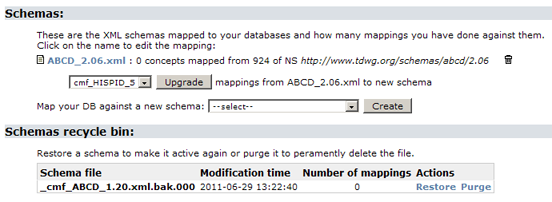
In the mapping editor, the link Overview at the top of the page will take you back to the datasource configuration overview. After creating a mapping, it will appear in the section Schemas. The entry will show the number of mapped elements (0 for now) and the schema namespace. Pressing the trash can symbol will move it to the trash can, which means that your web service does not support this schema anymore; if you did this by mistake, you can restore it by pressing the Restore button. Purge will delete the schema mapping permanently:
You can map several schemas for a given datasource. For example, in addition to the current ABCD2 standard, you could add the deprecated version 1.2 (even though I have no idea why you should do that) or DarwinCore. Just select the appropriate schema in the drop-down list and click Create. Since the namespace of a schema will be used in requests, you cannot create two mappings for the same namespace. Trying this will get you an error message.
Adding Mandatory ABCD Elements
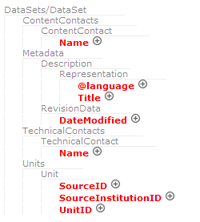
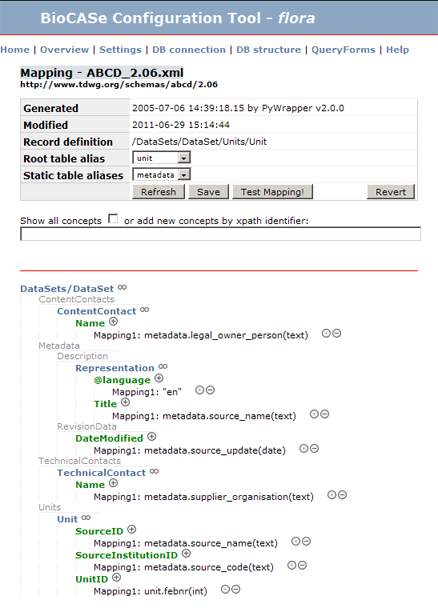
Clicking on a schema in the datasource overview page will take you again to the mapping editor. In the lower half of the page, you will see the basic structure of an ABCD document:
Technical/Content Contact: These trees hold information on who should be contacted for technical issues or questions concerning the published database, each with name, address, email address and telephone number.
Metadata: In this sub tree you’ll find all metadata fields, for example title and description of the dataset, ownership information, date last modified, IPR statements etc.
Units: This part stores the "real" data you want to publish, that means all specimen or observation data. The three elements already shown in the tree are identifiers that make up the so called "Triple ID", which uniquely identifies records within primary biodiversity networks such as BioCASe and GBIF:
- UnitID, which is a unique identifier for each record to be published (you can use the catalogue number, for example, or an existing barcode);
- SourceInstitutionID, an identifier for the institution publishing the dataset (for example BGBM);
- SourceID, an identifier for the dataset (e.g. “Herbarium Berolinense’’).
The elements already shown in the mapping editor are printed in red because they are mandatory, which means they are required for an ABCD document. Without them being mapped (to database fields that are non-empty), the Provider Software will not be able to construct valid ABCD documents and will not publish any records. So the first elements that should be mapped are the mandatory fields.
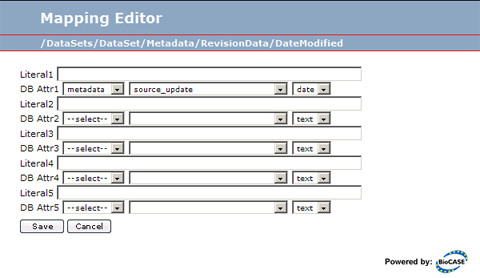
To add a mapping, click the + symbol next to the field, which will open the mapping editor dialog, where you can select the database table/column you want to map the ABCD element to:
In this case, the element /DataSets/DataSet/Metadata/RevisionData/DateModified is mapped to the column source_update of the metadata table, which has the data type date. (Remember that table/column retrieval is not supported for all DBMS, so if you’re unlucky, you might need to type in table/column name manually.) Save will accept your settings and close the dialog, Cancel will discard any changes.
Instead of mapping an element to a database field, you can map it to a literal. For example, you could enter the technical and content contact information directly as literals in the mapping editor dialog (assuming they’re the same for all records). However, we strongly discourage you from doing this. For one thing, this is just bad style, since it will scatter the information published over different places: Some will be retrieved from the database, some (the literals) will be loaded from the configuration files. Changing the metadata of your service later would then require access to the database and access to the BioCASe configuration – that means the configuration tool password. Be nice to the person who will do these changes and put everything neatly in a database table!
The second reason is even more important: Using literals for an element will result in this element to become not searchable, which means it cannot be used in a filter of a Search or a Scan request. Even though this behaviour is discoverable with a Capabilities request (by evaluating the searchable flag), a potential user of your web service might just not think of that, so it’s a good idea to avoid that in first place. Please use literals sparsely!
In the mapping editor window, you can select several source columns and several literals, even a combination of both. The Provider Software will simply concatenate the values retrieved from the database and the literals specified (in the order they’re given). But be careful: any use of concatenation or literals will make the element not searchable. A better solution is to do such manipulations earlier, in a database view, and direct the mapping editor to a single resulting database field.
Use the mapping editor window to add mappings for all eight mandatory fields: Click on the + symbol next to the element, choose table/column name and the correct data type, then press Save. When you’re done, the page should look similar to the following image. Press Save in the main window to write your changes to the configuration files.
Initial Testing of the Data Source
Once you’ve mapped all mandatory elements, you can do the first test of your BioCASe web service. Even though you haven’t mapped any real information yet, it is a good idea to check the service and solve any problems hitherto before continuing with the mapping. Click on Test mapping! to open the Query Form that can be used for this purpose:
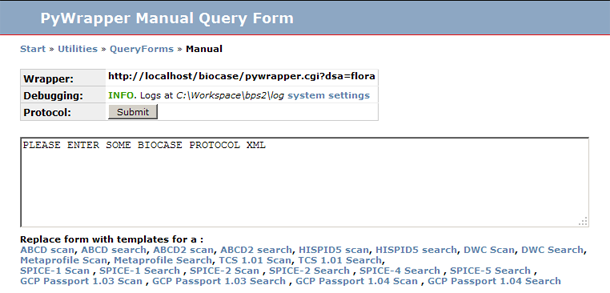
With the Query Form you can send a BioCASe request to your web service; it will wait for the reply of the web service and display the response document. On top of the page you can see the URL of your web service. In this case it is http://localhost/biocase/pywrapper.cgi?dsa=flora, flora being the name of the datasource. Make sure this is correct for your installation!
Into the text box below you can enter the request XML text. Because it would be cumbersome to enter the whole BioCASe request, you can use the links below the box to load templates. For now, click on ABCD2 Search to fill the box with a BioCASe Search request for documents in the ABCD2 format (the one you’ve just mapped):
<?xml version='1.0' encoding='UTF-8'?>
<request xmlns='http://www.biocase.org/schemas/protocol/1.3'>
  <header><type>search</type></header>
  <search>
    <requestFormat>http://www.tdwg.org/schemas/abcd/2.06</requestFormat>
    <responseFormat start='0' limit='10'>http://www.tdwg.org/schemas/abcd/2.06</responseFormat>
      <filter>
         <like path='/DataSets/DataSet/Units/Unit/Identifications/Identification/Result/TaxonIdentified/ScientificName/FullScientificNameString'>A*</like>
      </filter>
      <count>false</count>
  </search>
</request>
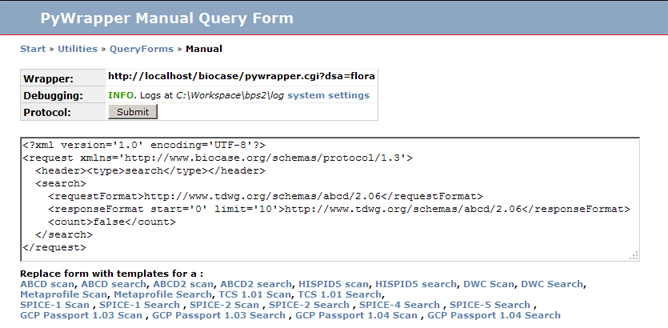
As you can see, there is a filter set on the ScientificName element. Since we haven’t mapped this element yet, this won’t work. So let’s remove the filter (all lines between <filter> and </filter>, including the filter tags), leaving the text box like this:
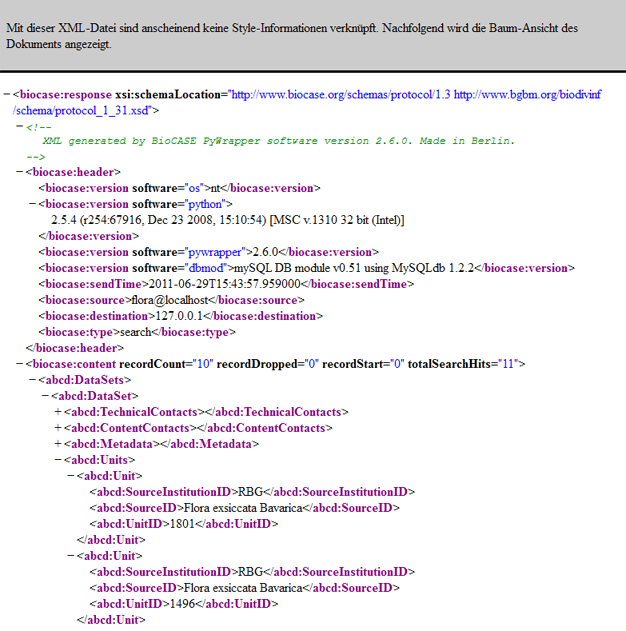
Pressing Submit will send the request to the web service and – hopefully – display the response document with the correct ABCD records. For the mapping we’ve just created, it should look similar to the following (use the "–" symbol next to the trees TechnicalContact, ContentContact and Metadata to collapse them):
If you get an error, please check out the Debugging tutorial on how to debug a web service. You should continue the mapping process only after your web service returns results for the basal mapping we’ve just created.
Adding additional ABCD Elements
Once you’ve successfully managed to map the mandatory ABCD elements ("successfully" means the web service returns ABCD documents), you can go on with the mapping process. This is usually an iterative process: You add a handful of elements (for example, country, country code, locality text and coordinates for the gathering site), then you use the Query Form to see if the information ends up where it is supposed to do. This is the reason the Query Form opens up in a separate tab (or window, of you configured your web browser so): In one tab, you use the mapping editor to add new elements; after pressing Save you go to the Query Form tab and see what the response documents look like. Redo this until you’ve mapped all information you want to publish.
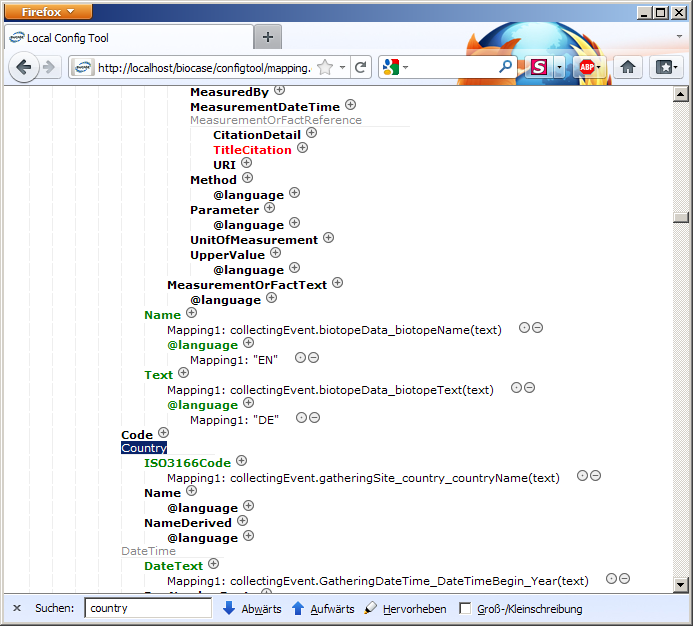
In order to map new ABCD concepts, tick the check box labelled Show all concepts and press Refresh. The mapping editor will then display the whole ABCD tree, which looks admittedly a bit intimidating. In order to find the concept you’re looking for, use the search function of your browser. If you want to map the country name of the gathering site, for example, hit Ctrl + F (for Firefox, Microsoft IE and Opera) and type in the name of the ABCD element, namely country. The browser will jump to the Country tree of the Gathering element, where you’ll find the elements for country name (Name), ISO country code (ISO3166Code) and the country name in the country’s language (NameDerived):
Continue the sequence mapping new elements/testing until you’ve mapped all information you want to publish. You can have a look at the list of recommend and commonly used ABCD elements on the Common ABCD2 Concepts and ABCD2Concepts pages. The full ABCD documentation can be found in the ABCD Wiki.
The following page will show you a sample response ABCD document for a web service with 77 concepts mapped. Of course your documents will look different, because you will probably use different ABCD elements, but still it’s good to get an idea: SampleABCDDocument.
