Installation (French)
This part of the wiki explains how to install the BioCASe Provider Software. Depending on your skills, it should take between 15 and 60 minutes. If you’re a beginner, please read the Beginner’s Guide first.
Requirements
Before installing, please make sure that the system you’re intending to install the BPS on meets the following requirements:
- You have administrative privileges on this machine, i.e. the user rights to install new software packages.
- It is accessible from outside your institution. This means it either needs to be outside any institutional firewall or, more likely, the HTTP port is open for an existing firewall.
- A direct connection can be established from this machine to the database to be published – either because there’s no firewall in between, or the port used by the DBMS is open (e. g. 3306 for MySQL).
If you find out one of these items is not met, please ask your system administrator for help, read the FAQ or get in contact with the BioCASe Team.
Installing Apache/IIS and Python
If you’re using a Linux system, you probably don’t need to install either, since Apache and Python are usually preinstalled. Same holds true for MacOS, but you should have a look at one of the articles on the web to find out about the file locations.
Even though the BPS runs with both Apache and Internet Information Server (IIS), we recommend using Apache, which is much easier to configure. However, if you’re already using IIS, you might want to stick with that. Recommended Apache versions are 2.0 and 2.2.
The BPS requires Python 2.5+ to run. Even though it also works with versions 2.6 and 2.7, the recommended Python version is 2.5. For later versions, the package required for connecting the BPS to the database used may be not available yet. You can go to the libs test page of the BGBM installation, find the package required for your DBMS and check out the availability for newer Python versions on the respective website (for example, the 4SuiteXML library required for running the Local Query Tool is currently only available for Python 2.5). By the way: You can install several different Python versions on the same machine without any conflicts.
If you’re installing on a Windows Vista (poor you) or Windows 7 machine, we recommend not to install Apache in the default program files folder, since there is some magic spell on that which can get you into trouble when changing Apache’s configuration files. Just choose another path (Apache Software Foundation?) to spare that hassle.
Once you’ve successfully installed Apache and Python, you can proceed to the next step.
Downloading the Provider Software
You can download the BPS either as a g-zipped archive or directly from our Subversion repository. First option is the easiest if you’re not familiar with Subversion; the second option makes it easier for you to update your installation later. So if you’ve never used Subversion before and plan not to keep your installation up-to-date, choose the archive. If you plan to set up a productive installation, which should be kept up-to-date, you should opt for the subversion repository.
Downloading the Archive File
Just download the archive from the Download section of the BioCASe site and unpack the contents to the destination folder.
Downloading from the Subversion Repository
If you’re using Windows, you need to install a Subversion client first (try Tortoise, which comes with a nice user interface). Linux and MacOS usually have Subversion preinstalled.
The URL for the latest stable version is http://ww2.biocase.org/svn/bps2/branches/stable, which we recommend to use. Updating your installation to the latest BPS version is then as easy as just running the Subversion update command. If you want to download a defined version, the URL would be http://ww2.biocase.org/svn/bps2/tags/release_2.6.0.
In order to download the BPS from subversion with the Subversion command line client (preinstalled on Linux/MacOS), just go to the destination and type in
svn co http://ww2.biocase.org/svn/bps2/branches/stable biocase
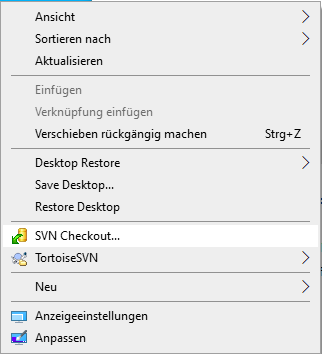
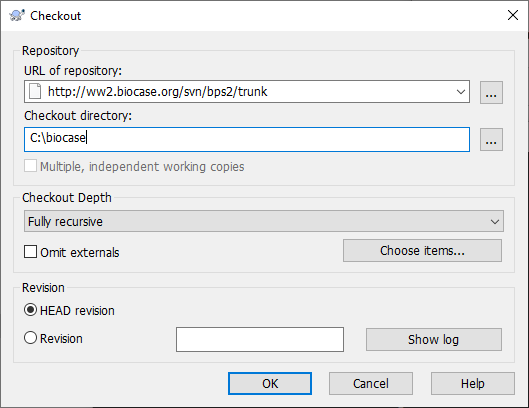
This will connect to our server with anonymous access and download all files to the folder biocase. In case you’re using Tortoise on Windows, right-click on the destination in the Windows explorer and choose Checkout. Fill in the URL, change the destination folder name into something meaningful and press OK:
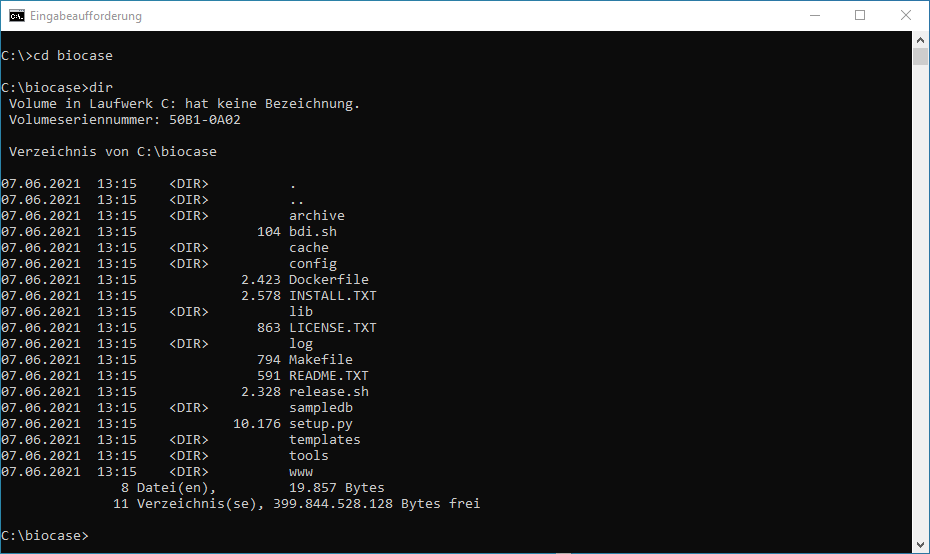
For the remainder of this guide, we will assume you’ve installed the BPS into a folder named biocase, which should look like this by now:
Running the Setup Script
The setup script will initiate the configuration files with values you provide and point the script files to your Python installation (you can re-run the setup script in case that location changes). If you want to modify any of settings you made during the setup, you can change the values in the configuration tool later.
In order to run the script, open a terminal window (or “command prompt” in Windows). Change the working directory to the folder you’ve downloaded the BPS to (biocase) and type in:
python setup.py
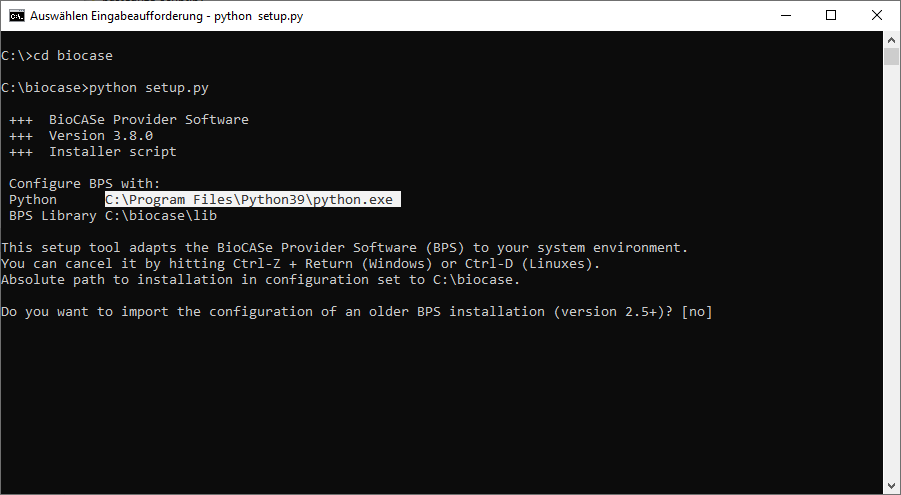
In case Python is not found, you’ll have to add the full path name to the Python executable. Make sure the Python version given in the fifth line of the output is the one you desire (otherwise add the path to the correct executable):
The questions asked by the setup script do have defaults. If you want to keep them, just press Return.
Webserver domain: This is the domain name of the web server you’re installing BioCASe on, e.g. http://www.myinstitution.org. You can keep the default localhost as long as you’re configuring and testing the installation locally; for production you’ll need to change that into the correct domain name (or IP address) later.
Base URL: This will become the second part of the URL your installation will use. If you keep the default biocase, your installation will be accessible later at www.myinstitution.org/biocase, for example.
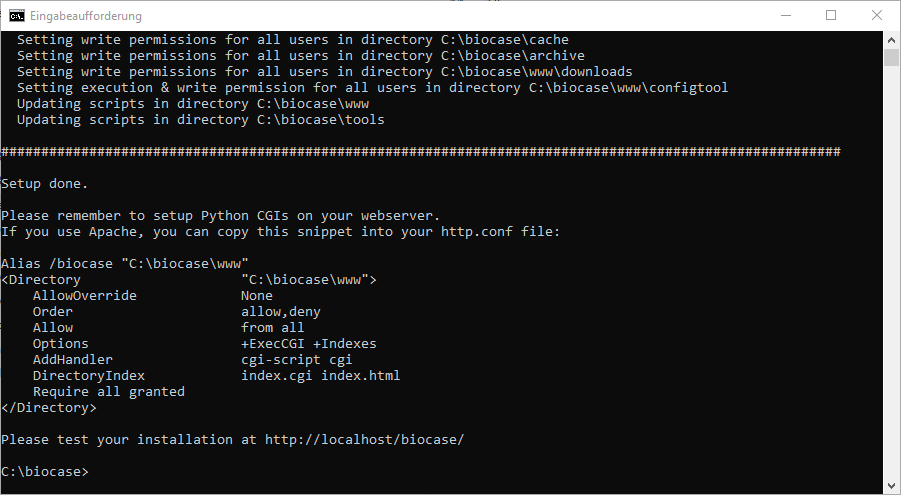
After answering these two questions, the script will update your files. At the end of the output you can find the lines you'll need later to create the link between BioCASe and your web server, so do not close the window!
Linking BioCASe and Your Web Server
The public part of the provider software is stored in the www subfolder of your BioCASe installation and must be configured in your web server as a public folder. You should always make this folder public using a virtual directory: This means that you should never install BioCASe under the default root folder of your web server. Doing so can compromise your server security and will allow people to see your configuration files (which include passwords). So since we installed BioCASe in c:\biocase, the folder that must be published with a virtual directory is c:\biocase\www and will be accessible later through http://www.myinstitution.org/biocase.
Apache
If you use Apache, adding the BioCASe folder to your web server environment is as simple as copying the lines printed at the end of the setup script to the end of the Apache configuration file httpd.conf. This can typically be found in the conf folder of your Apache installation. If you’re adding BioCASe to an already productive web server, please ask the server admin before doing any changes!
Save the file and restart Apache for the changes to take effect.
Internet Information Server
If you use Internet Information Server, you need to create a virtual directory for the folder c:\biocase\www using the IIS Server Manager. Grant all rights for this directory (Read, Write, Script Execution, Directory listing) and use the Configure button on the virtual directory tab and associate the file extensions .cgi and .py with Python. You should also add index.html to the list of default documents (Virtual Directory > Properties > Documents > Default).
We know that configuring Python for IIS can a pain; however, there are several good tutorials on the web, for example
- http://www.ecp.cc/pyiis.html
- http://support.microsoft.com/kb/276494
- http://python.markrowsoft.com/iiswse.asp
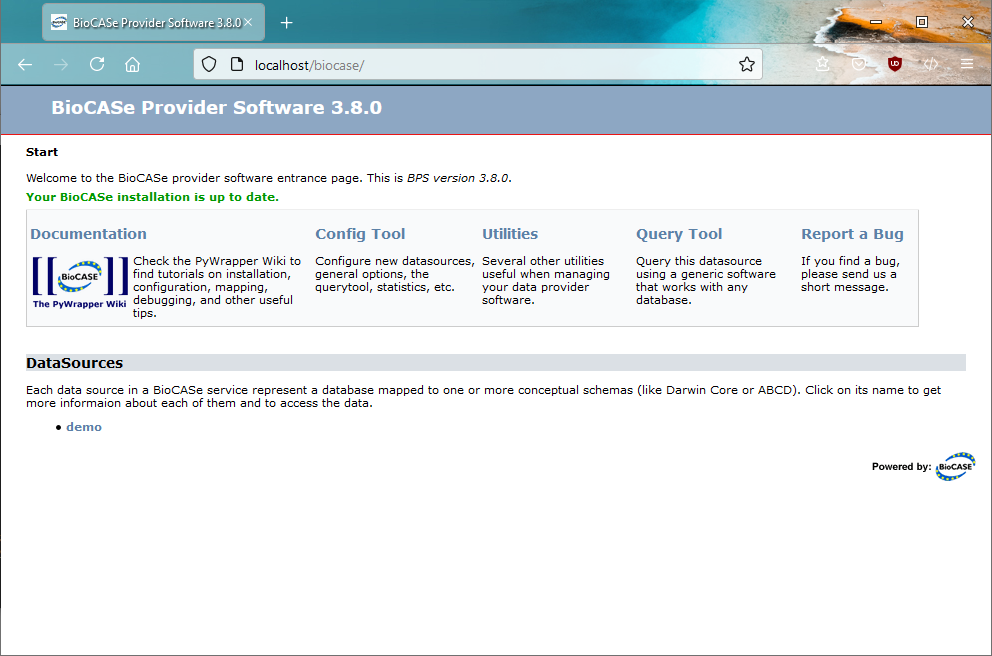
Once you’re done, you can test your BioCASe Installation by opening a browser and typing in http://localhost/biocase (replace localhost with the domain name of the machine you installed BioCASe on, if you’re not working locally). You should then see the start page of the BPS:
Installing Additional Python Packages
Before you can start configuring your installation, you need to install additional packages, depending on the management system used for the database to be published and the functions of the BPS you intend to use.
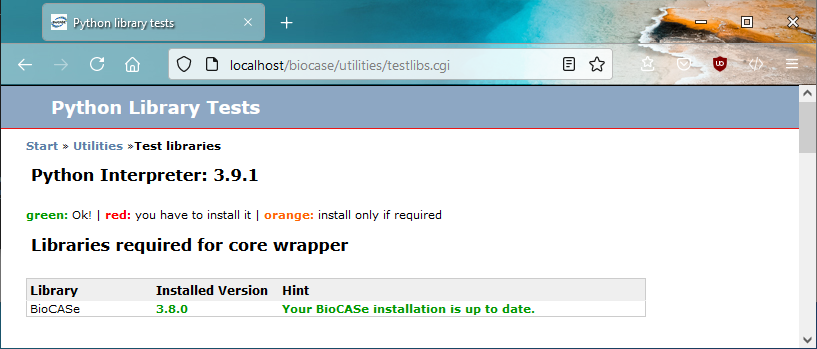
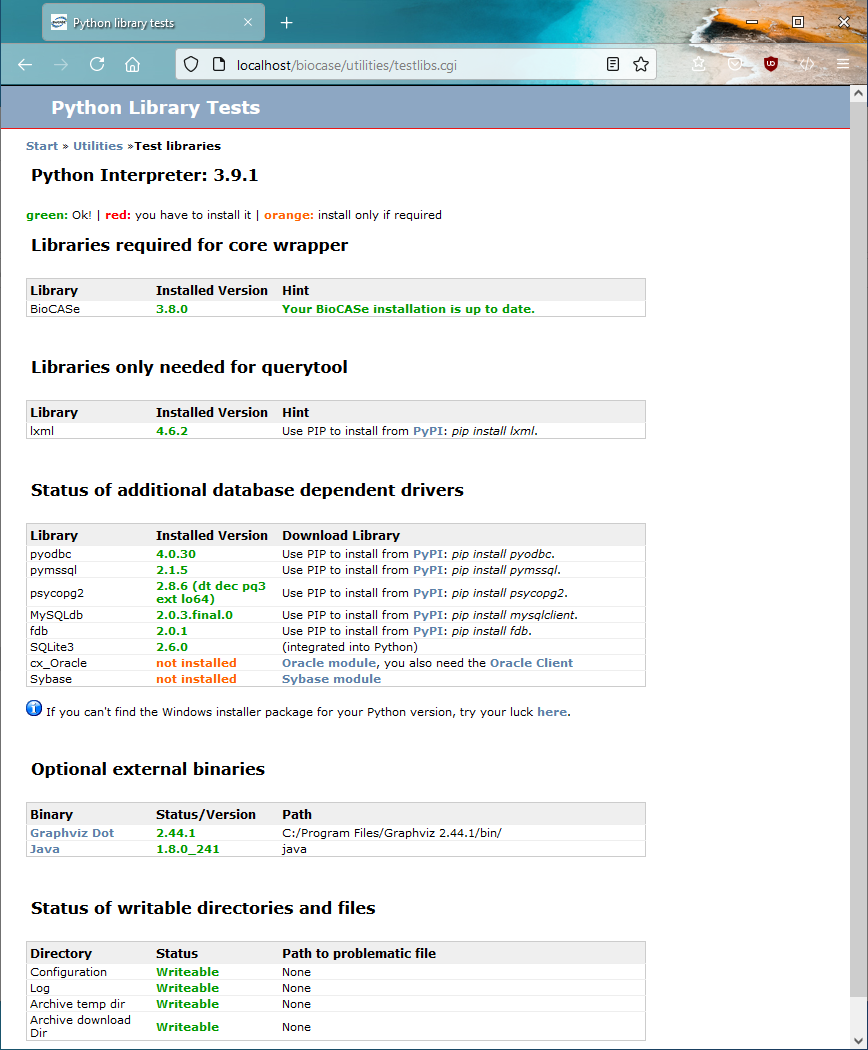
On the BPS start page, click on Utilities, then library test in order to navigate to the library test page that shows the status of installed libraries. On a fresh BPS installation, it should look similar to this:
The BioCASe libraries are already included in the archive file you’ve downloaded (or the Subversion repository you checked out from). The 4SuiteXML library is required only for the Local Query Tool – if you don’t plan to use it, you can ignore it. Otherwise click on the Download link, find the installer appropriate for your operating system and install it.
For each DBMS you plan to use with BioCASe (i.e. you have a database you want to publish with BioCASe), you’ll have to install the corresponding package. So if your collection is stored in a MySQL database, for example, click on the download link for the MySQL module, find the correct installer for your Python version and operating system and install. Once the installation is done, after reloading the libraries test page in the browser, the according list entry should turn from an orange ‘not installed’ into a green version number. Redo this process for all DBMS you want to connect to.
The Graphviz library listed under optional external binaries is used by the BPS to create a graph of your database’s data model in the table setup (you will learn in the Table Setup about this). If the data model is very simple (i.e., not more than 3 or 4 tables), you probably can spare the effort of installing Graphviz. Otherwise we recommend installing it: Simply click on the Download link, find the correct installer, and… you know the story.
Changing the Default Password
The configuration tool is a browser interface that allows you to configure almost every aspect of the BPS. As a last step of the setup, you should change the password.
Go back to the Start page of the BPS (by clicking Start at the top of the page, or by retyping http://localhost/biocase if the server is running on your computer), choose Config Tool, then System Administration. You will then be prompted for a password. Type in the default ACDC, then click Submit.
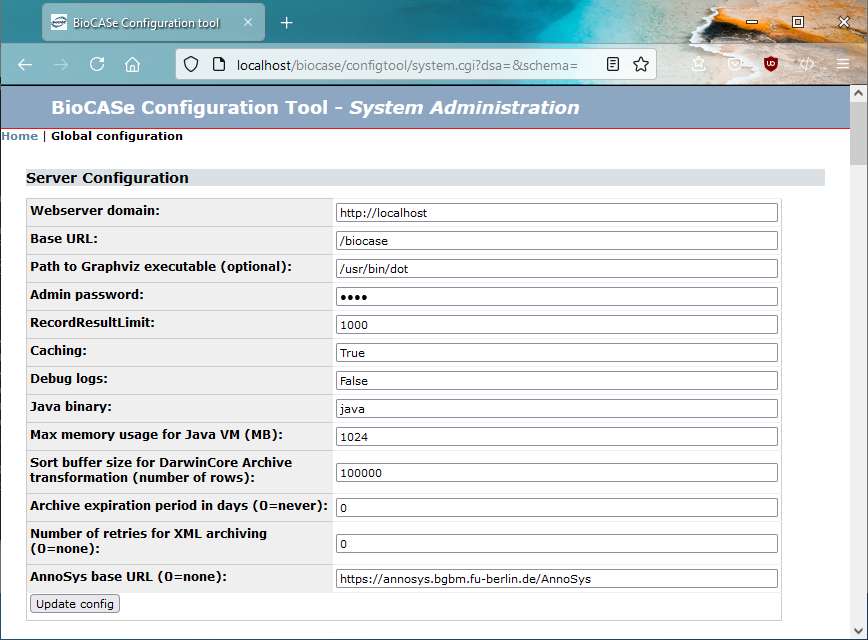
The top of the configuration page you’ll be directed to should look similar to this:
In the first two lines, you’ll see the values you entered during the setup script (in this case, the defaults localhost and biocase). In the fourth line, enter a new password. Please be careful when typing (if you forget the password some day, you can reset it by directly editing the configuration file). Press update config to save the new password to the configuration file.
In case you’ve installed Graphviz, you need to tell the BPS the location of the binaries, since it is not a Python package that will be registered automatically. In order to do so, locate the Graphviz installation on your local disk and enter the path to the binary executable into the text box labelled Graphviz dot binary. On Linux machines it might look similar to the default (/usr/local/bin/dot), on Windows machines it will be probably something like C:\Program Files\Graphviz2.26.3\bin\dot.exe. Press update config to save the path.
Checking Your Installation
Before you proceed to the configuration, you should make sure everything is installed correctly:
- Typing in http://localhost/biocase (or the appropriate values of your installation) takes you to the entry page of the provider software (as shown in the section Linking BioCASe and Your Web Server).
- The libraries test page (Utilities > library test) shows you’ve installed the packages for you DBMS, 4SuiteXML (if you want to use the Local Query Tool) and the Graphviz Dot (if you decided so).
- Status of writeable directories shows a green writeable for both the Logs and the Configuration. If not, the path to problematic file will be given – please grant write access to Python.
Let’s assume you want to use BioCASe in conjunction with a Postgres and an Access database (which will be connected to through ODBC) and you don’t care for the Query Tool, the libs page should look like this:
Installation From Software Provider BioCASE Aller à: Navigation, rechercher Installation
Cette partie du wiki explique comment installer le logiciel fournisseur de données BioCASe (‘BioCASe Provider Software’ aussi appelé BPS). Cela devrait prendre entre 15 et 60 minutes. Si vous êtes un débutant, s'il vous plaît lire le Guide du Débutant en premier lieu. Contenu
   * 1 Prérequis
   * 2 Installation de Apache / IIS et Python
   * 3 Téléchargement du logiciel fournisseur de données
         o 3.1 Téléchargement du fichier d'archive
         o 3,2 téléchargement à partir du serveur Subversion
   * 4 Exécution du script d'installation
   * 5 Lier BioCASe et serveur Web
         o 5.1 Apache
         o Internet Information Server 5.2
   * 6 Installation de paquets Python supplémentaires
   * 7 Modification du mot de passe par défaut
   * 8 Vérification de l'installation
Prérequis
Avant de commencer l’installation, assurez-vous que le système sur lequel vous avez l'intention d'installer le BPS remplit les conditions suivantes:
  1. Vous avez des privilèges d'administrateur sur cette machine, c'est à dire les droits d'utilisateur pour installer de nouveaux logiciels.
  2. Il est accessible de l'extérieur de votre établissement. Cela signifie qu'il doit soit être en dehors de tout pare-feu institutionnel ou que, plus probablement, le port HTTP pour un accès Web est ouvert pour un pare-feu existant [note : il n’est pas nécessaire de stasifaire cette condition si vous installez BioCASe a des fins de tests ou de travail individuel sur votre propre ordinateur].
  3. Une connexion directe peut être établie à partir de cette machine à la base de données à publier - soit parce qu'il n'y a pas de pare-feu entre les deux, ou bien que le port utilisé par le SGBD est ouvert (par exemple 3306 pour MySQL, 5432 pour PostGres, 1433 pour Microsoft SQL server). Si le logiciel BioCASe est installé sur la même machine que le serveur de base de données, le pare-feu n’a normalement pas à être ouvert
Si une de ces conditions n'est pas remplie, veuillez contacter votre administrateur système de l'aide, lisez la FAQ ou prenez contact avec l'équipe BioCASe (support@biocase.org et /ou du projet CABIN).
Installation de Apache / IIS et Python
Si vous utilisez un système Linux, vous n'avez probablement pas besoin d'installer ces logiciels, car Apache et Python sont généralement préinstallé. Il en va de même pour MacOS X, mais vous devriez jeter un oeil aux discussions et soruces de documentations accessible sur web pour en savoir plus sur les emplacements de fichiers.
Même provider fonctionne avec Apache et Internet Information Server (IIS), nous vous recommandons d'utiliser Apache, qui est beaucoup plus facile à configurer. Toutefois, si vous utilisez déjà IIS, vous voudrez peut-être rester sur cette plateforme. Les versions d'Apache recommandées sont 2.0 et 2.2.
Le BPS nécessite Python version 2.5 (et autres sous-versions) afin de fonctionner. Même s’il fontionne également avec les versions 2.6 et 2.7, la version recommandée est de 2,5 Python. Pour les versions ultérieures, les librairies nécessaire pour la connexion du BPS à la base de données utilisé ne sont peut être pas encore disponible. Vous pouvez aller à la page de test des librairies de l'installation du Musée et Jardin Botanique de Berlin , trouver le paquet requis pour votre système gestionnaire de bases de données et vérifier la disponibilité de nouvelles versions de Python sur le site Web respectif (par exemple, la bibliothèque 4SuiteXML requis pour l'exécution l’interface de requête locale est actuellement uniquement disponibles pour Python 2.5). Soit dit en passant: vous pouvez installer plusieurs versions différentes de Python sur la même machine sans conflits.
Si vous faites l’installation sur un ordinateur Windows Vista ou Windows 7, nous vous recommandons de ne pas installer Apache dans le dossier Program Files par défaut, car installé à cet endroit le serveur Apache a un comportement imprévisible qui peut vous causer des ennuis lors du changement de fichiers de configuration. Il suffit de choisir un autre chemin (par exemple C:\\Apache22 ou D:\\Apache22) pour parer à cet inconvénient.
Quand vous avez installé avec succès Apache et Python, vous pouvez procéder à l'étape suivante.
Téléchargement du logiciel fournisseur
Vous pouvez télécharger le BPS soit comme une archive zippée g-ou directement à partir de notre dépôt Subversion. La première option est la plus facile si vous n'êtes pas familier avec Subversion; avec la deuxième option, il est plus facile pour vous de mettre à jour votre installation ultérieurement. Donc, si vous n'avez jamais utilisé Subversion avant et ne prévoyez pas de mise à jour régulière de votre installation, choisissez l'archive. Mais si vous prévoyez de mettre en place une installation de production, qui devrait être mis à jour, vous devriez opter plutôt pour le dépôt subversion.
Téléchargement du fichier d'archive
Il suffit de télécharger l'archive à partir de la section Téléchargement du site BioCASe et décompresser le contenu du dossier de destination.
Téléchargement à partir du dépôt Subversion
Si vous utilisez Windows, vous devez installer un client Subversion premier (Tortoise , qui est livré avec une jolie interface très commode). Linux et MacOS contiennent généralement un client Subversion préinstallé.
L'URL de la dernière version stable est http://ww2.biocase.org/svn/bps2/branches/stable, que nous vous recommandons d'utiliser. La lise à jour de votre installation à la dernière version BPS est alors facile et revient à exécuter la commande « update » de Subversion. Si vous voulez télécharger une version définie, l'URL serait http://ww2.biocase.org/svn/bps2/tags/release_2.6.0 (dans le cas de la version 2.6.0). Pour télécharger le BPS avec le client Subversion en ligne de commande (préinstallé sur Linux / MacOS), allez simplement au répertoire sur lequel vous voulez décompressez l’archive et introduisez :
svn co http://ww2.biocase.org/svn/bps2/branches/stable biocase
Vous vous connecterez au serveur du Jardin et Musée Botanique de Berlin avec un accès anonyme et télécharger tous les fichiers du sous-répertoire l'BioCASe.. Dans le cas où vous utilisez Tortoise sous Windows, faites ub clic-droit sur le répertoire de destination dans l'explorateur Windows et choisissez « Checkout». Introduisez l'URL (http://ww2.biocase.org/svn/bps2/branches/stable), changez le nom du dossier de destination pour qu’il soit significatif et facilement reconnaissable par vous et appuyez sur OK:
Nous supposerons dans la suite de cette explication que vous avez installé le logiciel BPS dans un dossier nommé BioCASe, qui devrait ressembler à ceci maintenant:
Exécution du script d'installation
Le script d'installation lancera les fichiers de configuration avec les valeurs que vous fournissez et liera les fichiers de script à votre installation de Python (vous pouvez ré-exécuter le script de configuration dans le cas où vous modifiez l’emplacement des répertoires d’Apache, Python ou du logiciel lui-même sur votre ordinateur). Si vous souhaitez modifier ou corriger l'un des paramètres que vous avez déclarés pendant l'installation, vous pouvez changer les valeurs en relançant à nouveau le script d’installation. Pour exécuter le script, ouvrez une fenêtre de terminal (ou «invite de commande" dans Windows, à laquelle vous pouvez accéder sur Windows via le sous-menu « accessoire » du menu général, ou bien en tapant «cmd» dans le menu « exécuter »).
Changez le répertoire de travail vers le dossier que vous avez téléchargé le BPS (par exemple « cd D://biocaseprovider ») et tapez:
python setup.py
Si la commande ne marche pas , vous devez peut-être ajouter le nom de chemin complet vers l'exécutable Python. Exemple (sous Windows et DOS, en supposant que vous avez installé python dans sa version 2.5 et dans le répertoire C:\Python25. Adaptez les valeurs en fonction de la situation sur votre ordinateur) C:\Python25\setup.py setup.py Assurez-vous que la version de Python donnée dans la cinquième ligne de la sortie correspond à celle que vous désirez (sinon ajoutez le chemin complet vers la bonne version de l’intepréteur comme décrit ci-dessus):
InstSetupScriptStart.png
Les questions posées par le script de configuration proposent des valeurs par défaut. Si vous souhaitez les conserver, il suffit d'appuyer sur Entrée.
Domaine Webserver: Il s'agit du nom de domaine du serveur Web que vous installez sur BioCASE, par exemple, http://www.moninstitution.org. Vous pouvez conserver le localhost par défaut tant que vous configurez et testez l'installation localement, mais pour une machine la production réellement accessible par Internet, vous aurez besoin de changer cela dans le nom de domaine correct (ou adresse IP) plus tard.
URL de base: Ce sera la deuxième partie de l'URL de votre installation (l’adresse du site dans le serveur, par xemple http://moinstitution.org/monbiocase/ ). Si vous gardez la valeur par défaut, votre installation sera accessible plus tard à www.myinstitution.org/biocase.
Après avoir répondu à ces deux questions, le script mettra à jour vos fichiers. À la fin de la sortie que vous pouvez trouver les lignes dont vous aurez besoin plus tard pour créer le lien entre BioCASe et votre serveur web. Il ne faut donc pas fermer la fenêtre!
